
8 | Southern Comfort
I’m from the North. Some Southern food I’m still gettin' used to eating. There were many dishes I hadn’t tried or even heard of before I moved to Tennessee. Black-eyed peas, fried green tomatoes, and peach cobbler are a few of the many dishes I now love. I don’t have room in this meal plan to share all that I’ve picked up since moving here, but today, I’ll share a few of my favorites. These recipes are planned for four people. They are easy to double so you can invite over more family or friends for a southern style social. Here is the shopping list.
1 | Main Dish
Fried Green Tomato-wich
There used to be a roadside stand just down the street from my house with the most flavorful vegetables. One day, the lovely lady there explained how simple it was to make fried green tomatoes. With the addition of parmesan cheese, I’ve been doing it her way ever since. Putting it in a sandwich with my lemony herb sauce makes it a complete meal.
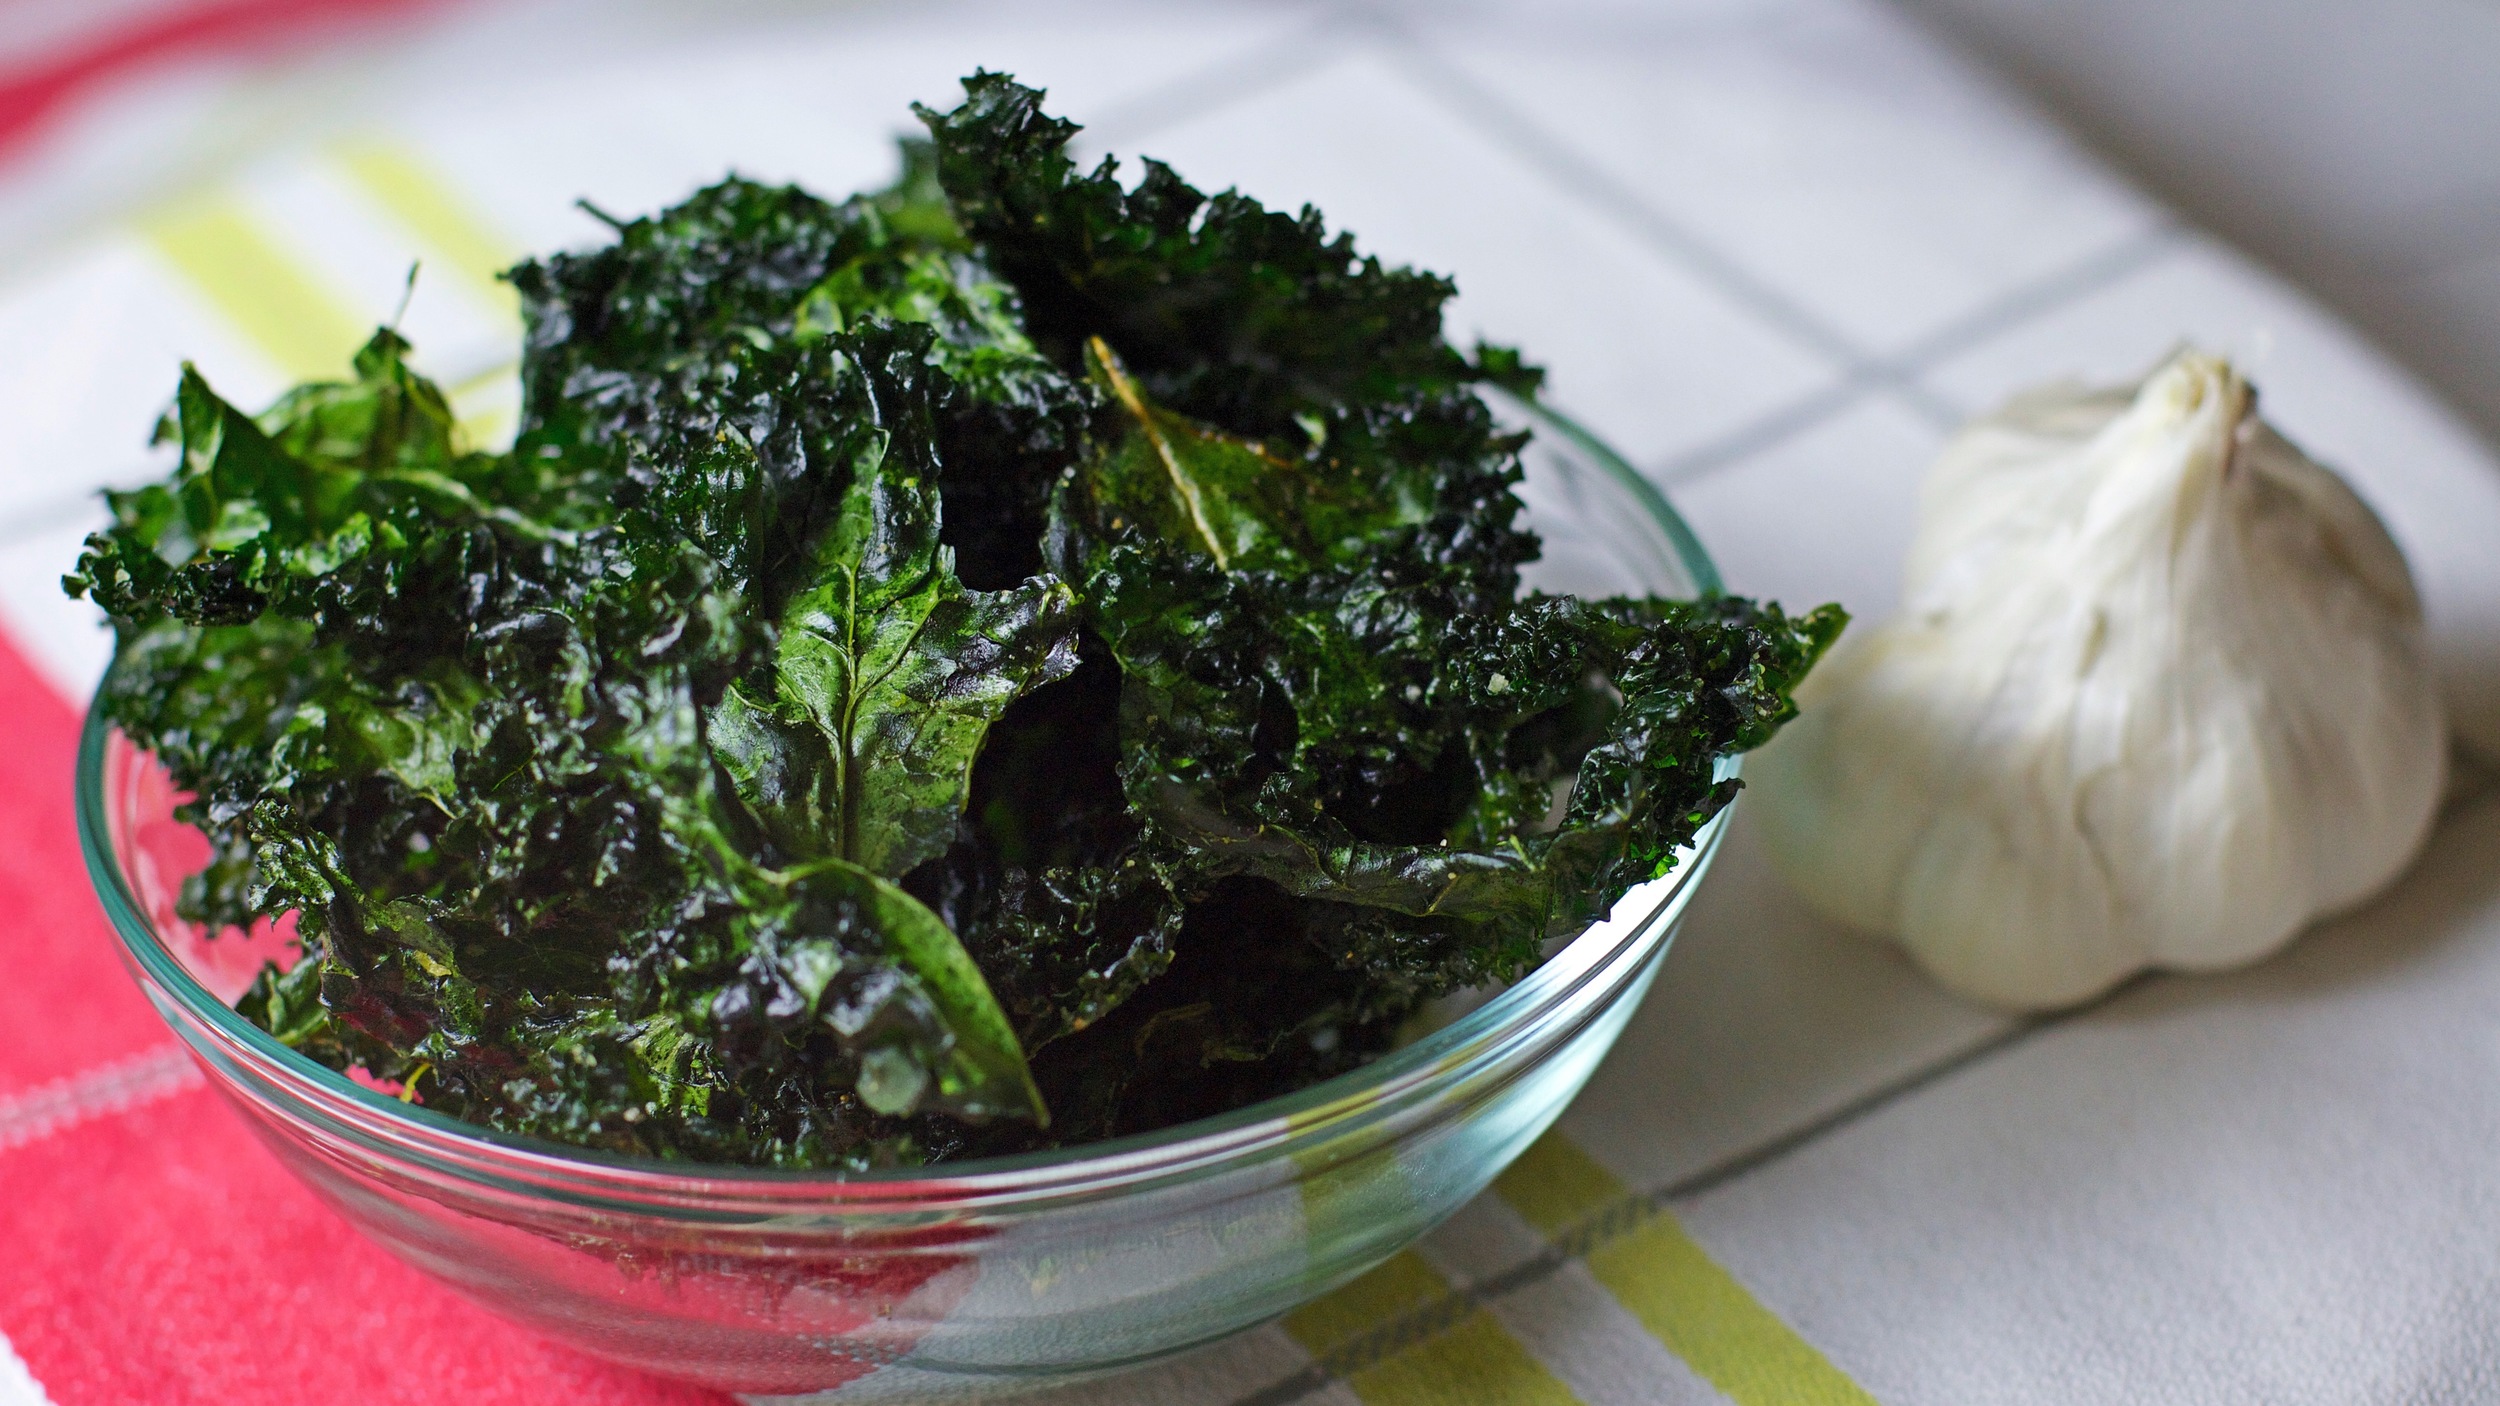
3 | Side
Garlic Kale Chips
Vegetables are not usually the center of attention in comfort food. Sometimes they even get pushed to the back burner and forgotten about. This is a lighter adaptation of fried southern greens. It’s a light and simple dish that’s easy to make and super flavorful. This super-green recipe is sure to be unforgettable at your next family meal.
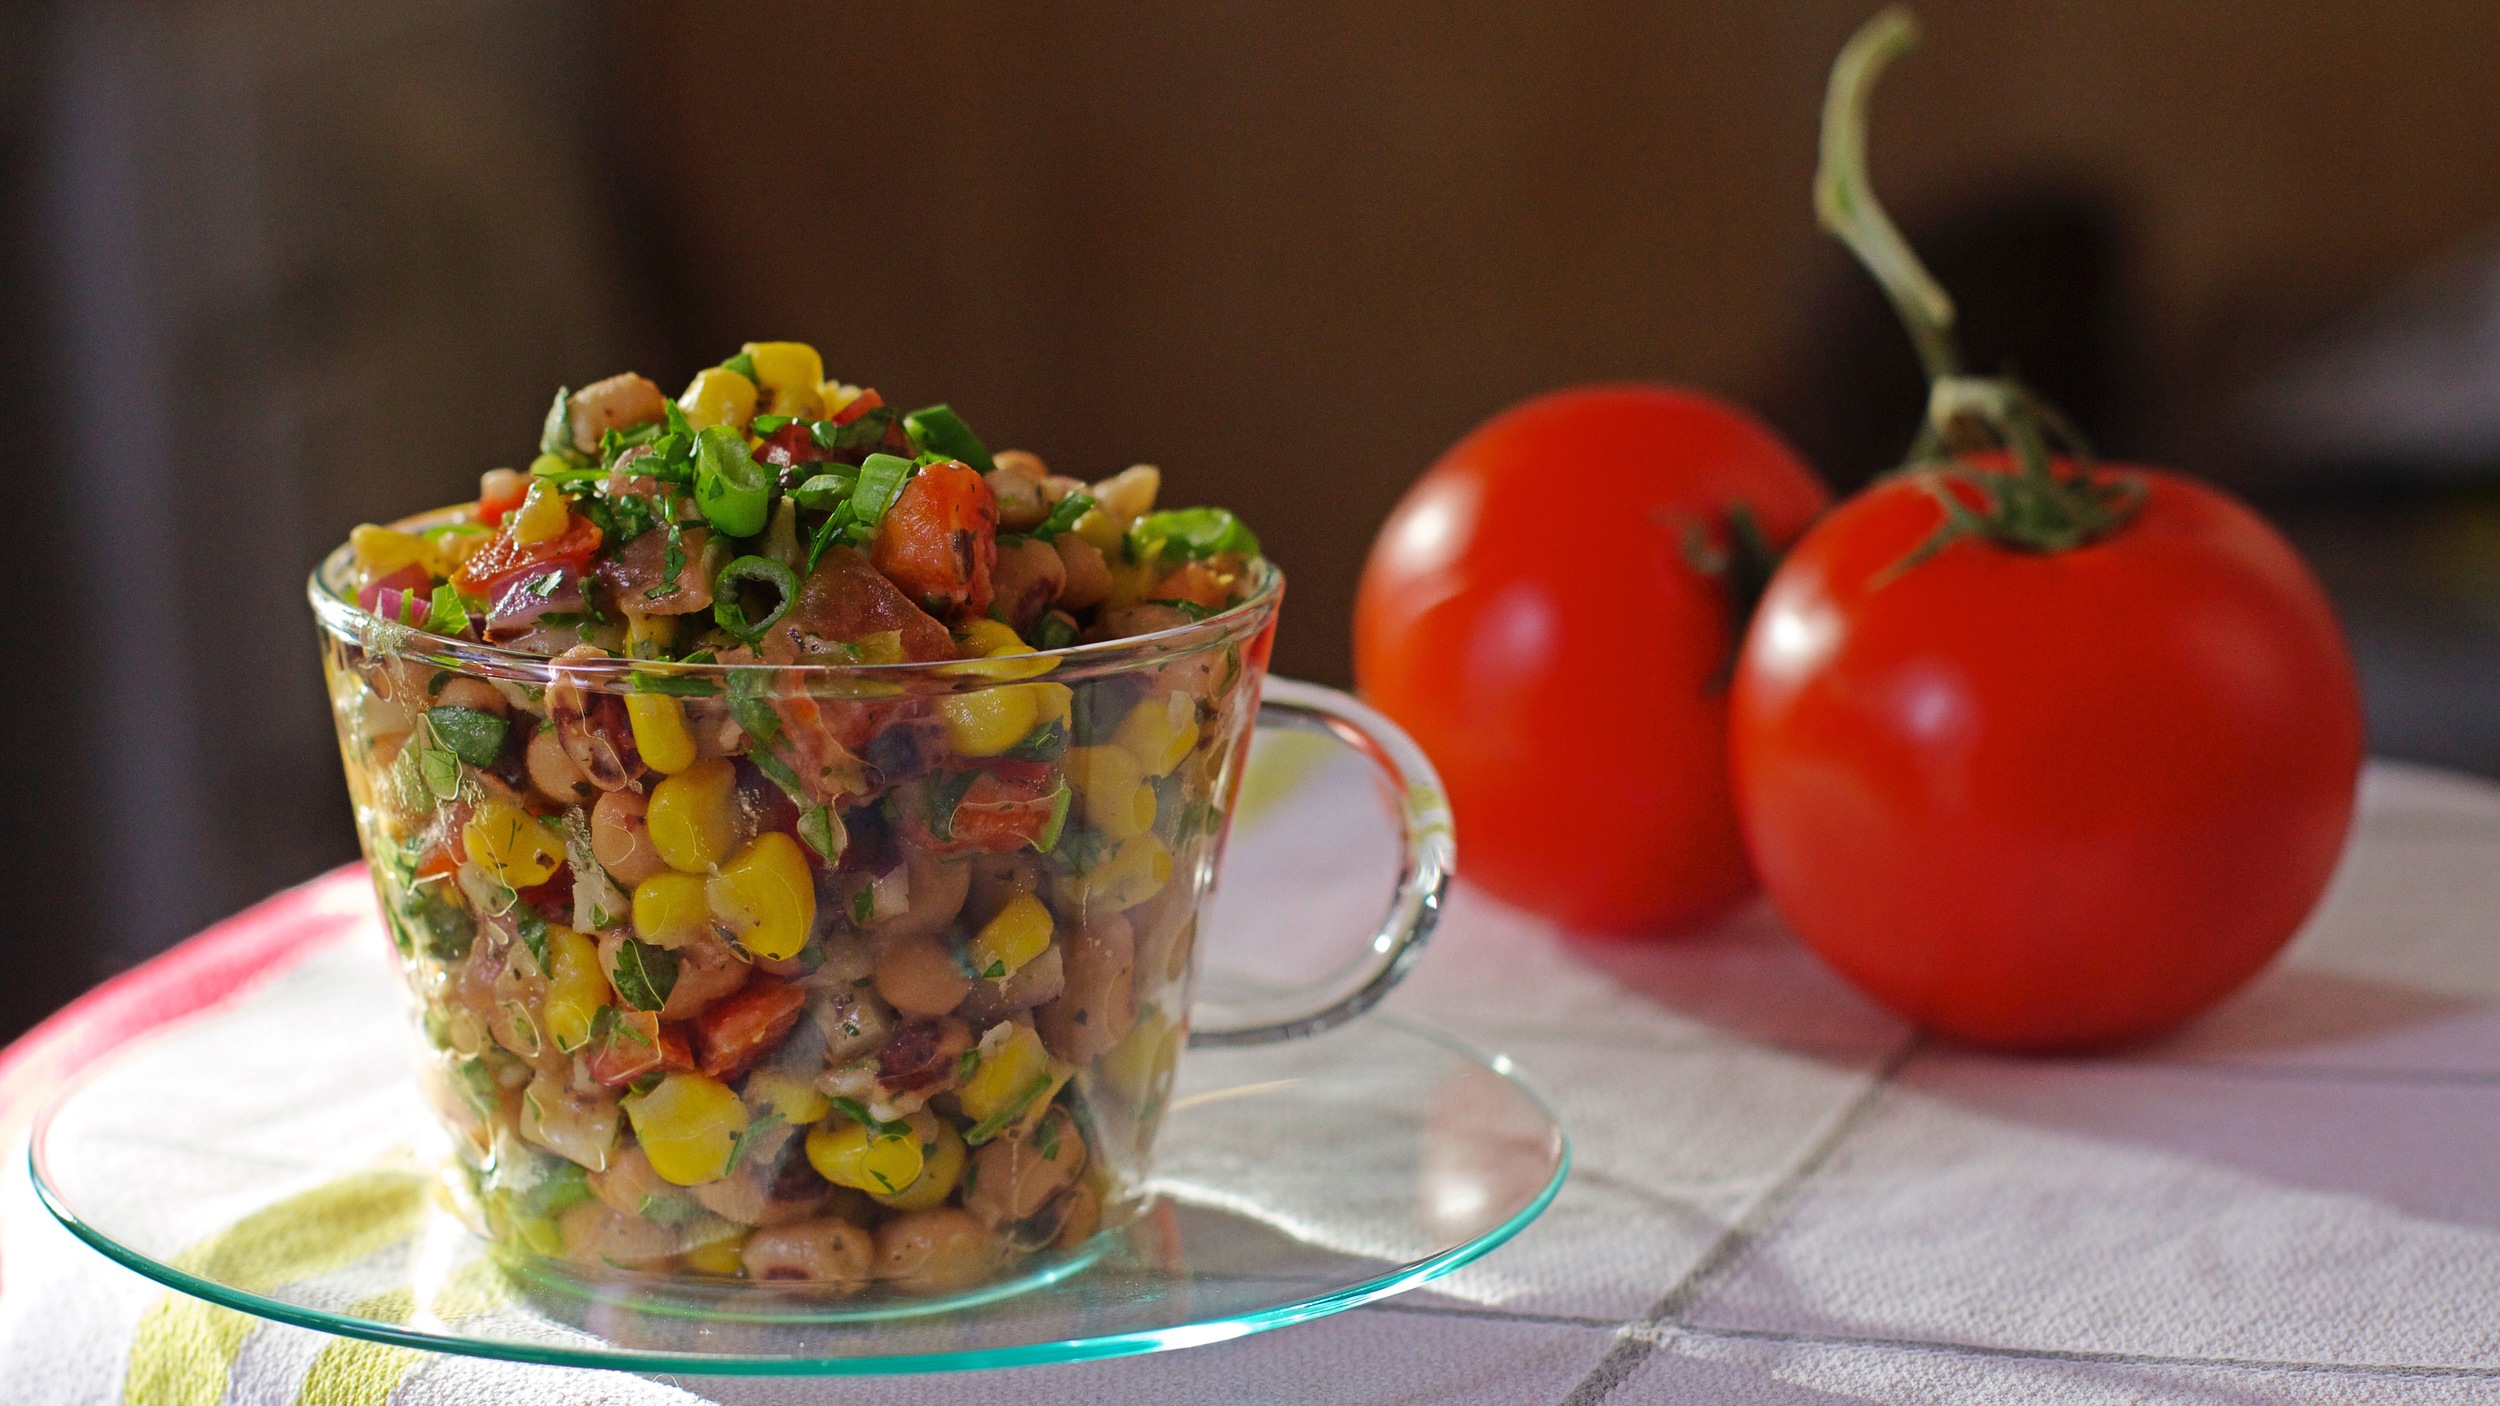
2 | Salad
Black-eyed Peas n' Corn Salad
Fifteen years ago was the first time I had heard of black-eyed peas. It wasn’t until more recently that I finally decided to try them in recipes of my own. This is a fresh salad inspired by southern grown ingredients. Not typical for southern fare, the herb dressing coats the vegetables and black-eyed peas to create more than just a side salad.
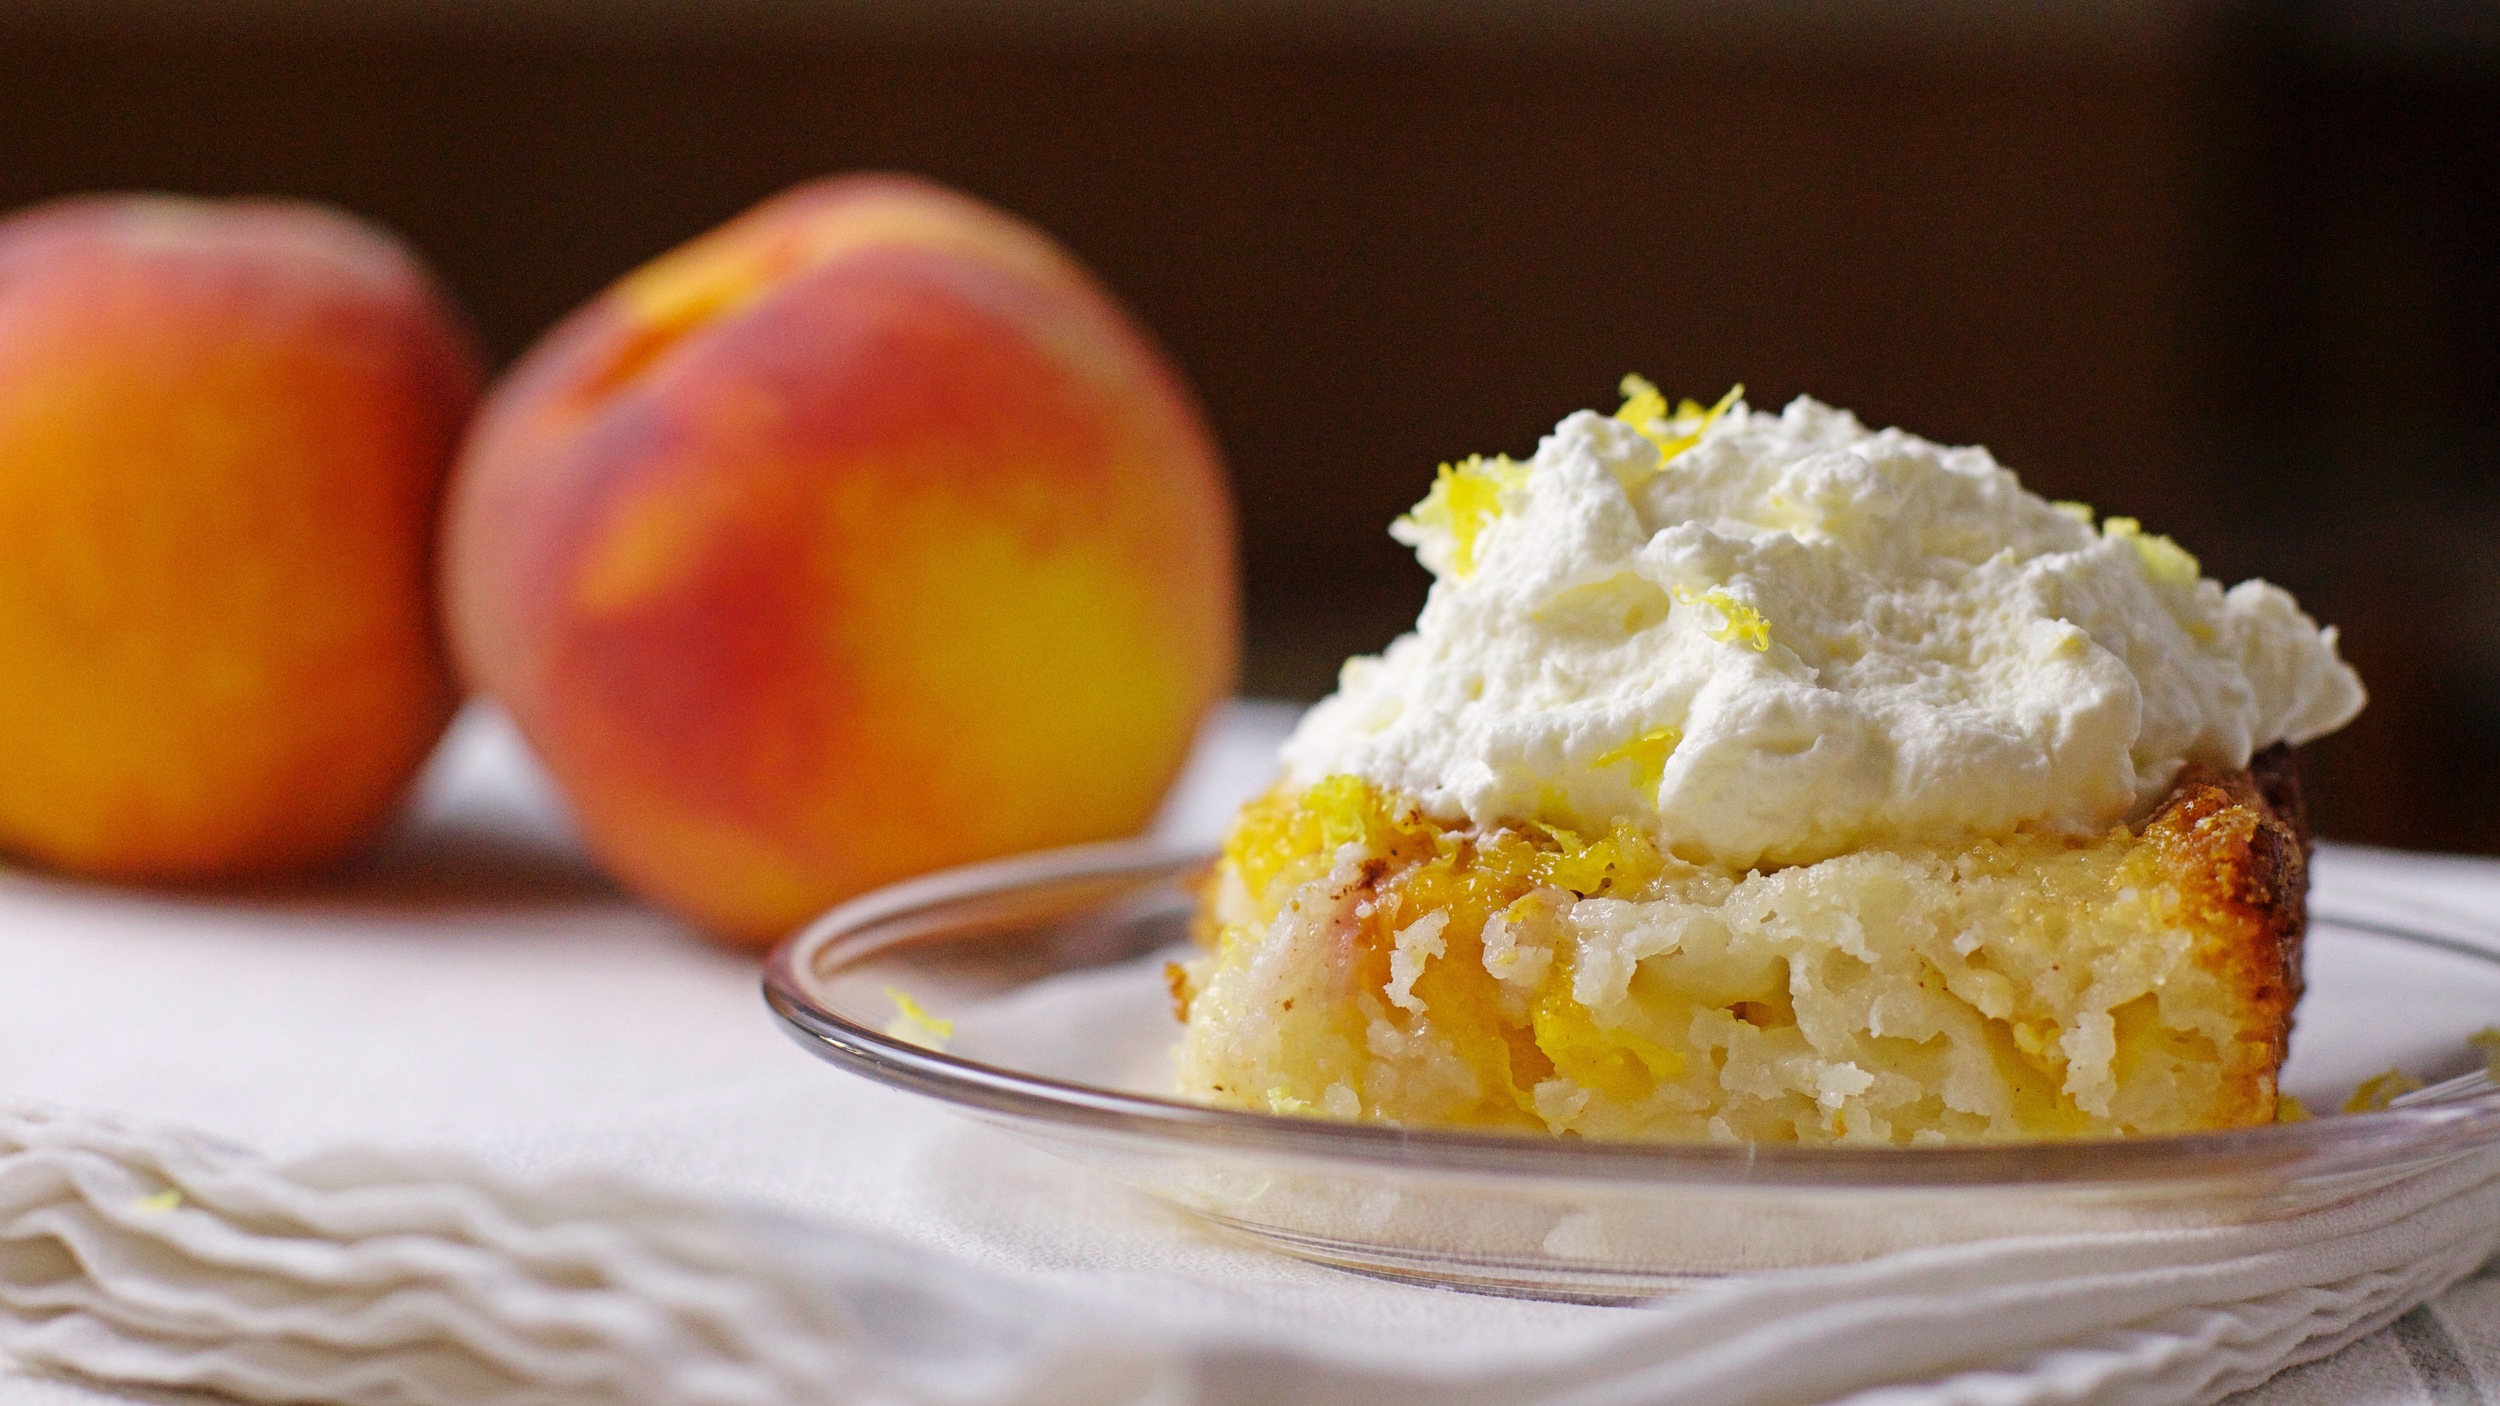
4 | Dessert
Upside Down Peach Cobbler
South Carolina peaches are, I’m just going to say it, the best in the world. I’ve always loved peaches, but nothing compares to what I was introduced to down here. Cobbler just makes sense when there are so many peaches during peach season. Buttermilk adds moisture and tartness to a ordinary cobbler, but the lemon whipped cream is something to write home about.
“Some foods are so comforting, so nourishing of body and soul, that to eat them is to be home again after a long journey. To eat such a meal is to remember that, though the world is full of knives and storms, the body is built for kindness. The angels, who know no hunger, have never been as satisfied.”
- Eli Brown, Cinnamon and Gunpowder
INSTRUCTIONS
1 | Main Dish
Fried Green Tomato-wich

2 medium green tomatoes
1 cup flour
1/4 teaspoon salt
1/4 teaspoon ground black pepper
1 cup buttermilk
1 1/2 cup corn meal
1/2 teaspoon salt
1/4 teaspoon ground black pepper
1/4 cup finely shredded parmesan cheese
4 eggs
arugula
your favorite bakery fresh buns
Lemon Cilantro Mayo:
1/2 cup mayo
juice from 1/2 lemon
zest from 1/2 lemon
1/4 cup cilantro, finely chopped
Want to make this gluten-free? For a great gluten-free option, you could toast your favorite gluten-free bread or make this into a layered salad. Place arugula onto your plate. Top that with two fried green tomatoes and one fried egg. Lastly, place a nice dollop of mayo on the top. When you cut into the egg, the yolk and mayo mix together to make a delightful saucy dressing over the tomatoes and arugula.
Doing the prep work once– Zesting a lemon is easier before cutting it. So for meals like this one be sure to zest each lemon before you cut it to juice it. This recipe uses half a lemon, which includes the zest and the juice. The next recipe uses only the juice from half a lemon and the dessert uses the zest from half a lemon. So zest the whole lemon and divide that into two separate little bowls. Then juice the whole lemon and divide that into two separate bowls. When the time comes to make the next recipe, you’ll have done the work once and can add the zest or juice into the appropriate dish.
The Simple Steps...
1. Fry the green tomatoes.
- My Method: Wash and dry the tomatoes.
- Slice off the top and discard it. Cut the rest of the tomatoes into 1/4” thick slices.
- Get three dishes with low sides. Place the flour, 1/4 teaspoon salt, and 1/4 teaspoon pepper into the first one. Pour the buttermilk into the second. Mix the corn meal, 1/2 teaspoon salt, 1/4 teaspoon pepper, and parmesan cheese together in the third one. By seasoning the flour and cornmeal, the flavor is layered into the fried green tomatoes. I use pie plates because the low sides make for easy dipping.
- Toss the tomato into the flour to coat it and shake off the excess. Then dip it into the buttermilk. Finally, coat the tomato in the corn meal mixture and place the coated tomatoes into a prepared fry pan.
- Place a large fry pan on medium to medium-low heat then add about 1/4” vegetable oil to the pan. Fry the tomatoes about 3-4 minutes on each side or until they are golden brown.
- Lay the cooked tomatoes onto a cooling rack with paper towels on it. The paper towels will absorb excess oil and keep the tomatoes from getting soggy.
- Continue this process for all the slices of green tomato.
2. Fry the eggs.
- My Method: Place a large fry pan on low heat. Use a non-stick pan if you have one.
- Once the pan is hot, add a tablespoon or two of vegetable oil and swirl it around to coat the whole pan.
- Crack each egg into separate small bowls. Slide them into the pan allowing each to fry a little as you drop it into place.
- Place a lid on the pan and cook the eggs for three-four minutes depending on how hard you like the yolk. The longer you the egg is cooking the harder the yolk will be.
- Sprinkle each egg with a pinch of salt and pepper.
- Flip the eggs and cook another minute.
3. Layer the sandwich.
- My Method: Smear lemon cilantro mayo on the inside of the bun both top and bottom.
- Place two fried green tomatoes, one fried egg, and a small handful of arugula on each bun. This is a little messing, but worth it!
Lemon Cilantro Mayo:
1. In a small bowl, combine all the ingredients.
2. Prepare this ahead of time so that the lemon and cilantro will permeate the mayo making for a more intense flavor.
2 | Side
Black-eyed Peas n' Corn Salad
1/2 red pepper
2 roma tomatoes
1/2 green chili
3 green onions
3/4 cup fresh chopped parsley
2 cans black eyed peas, drained and rinsed (15 oz can)
1 1/2 cups frozen corn
dressing:
3 tablespoons vegetable oil
juice from 1/2 lemon
1 clove garlic, minced
1/2 teaspoon dried basil
1/2 teaspoon dried oregano
1/2 teaspoon salt
Want to make this dairy or gluten-free? This is already a dairy and gluten-free recipe!
Make ahead option– This dish tastes even better the day after you first make it. The dried herbs and lemon juice have a chance to permeate the whole dish. It can be stored in an airtight container in the fridge for 5 days. It's so delicious don't feel guilty if you eat it straight from the container!
The Simple Steps...
1. In a large mixing bowl, combine the dressing ingredients.
2. Prepare the vegetables to be added to the bowl.
- My Method: Wash and dry the pepper, tomatoes, chili, and green onions.
- Cut the red pepper and tomatoes into 1/2 inch chunks.
- Chop the green chili into very small 1/8 inch pieces. You can use 2 tablespoons canned diced green chilis instead of the fresh chili. They are milder, but still flavorful.
- Slice the green onion into 1/4 inch pieces.
3. Add the vegetables to the bowl and mix to coat everything with the dressing.
4. Cook the corn.
- My Method: Fill a small pot with 1/2 inch of water.
- Bring water to a rapid boil and add the corn and cover the pot.
- Cook for 3 minutes.
- Strain off the water and set the corn aside to cool just a bit.
- If desired, use 3 ears of corn instead of frozen corn. Watch this video to see how to cut corn of the cob.
5. Stir in the black-eyed peas and corn into the bowl with the vegetable mixture.
6. Taste. Does it need more salt? Add 1/8 teaspoon salt and toss. Taste again.
3 | Side
Garlic Kale Chips
1 bunch of kale – I used curly kale.
1 1/2 tablespoons olive oil or coconut oil
1/2 teaspoon salt
1/4 teaspoon garlic powder
Want to make this dairy or gluten-free? No worries tonight. This alternative to Southern fried greens is already a dairy and gluten-free recipe!
Make ahead option– The kale chips can be made and kept in a sealed container once they are cool. There's no need to refrigerate these.
The Simple Steps...
1. Preheat the oven to 300˚.
2. Wash the kale and dry it with a towel. When the kale is completely dry, the oil and salt stick to it. Also, the drier the kale leaves are to start with the faster they will crisp up in the oven.
3. Rip off the hard stems and throw them away. Tear the leaves into 2 inch pieces.
4. Put the torn kale into a large bowl. Toss with the oil, salt, and garlic powder making sure all the pieces are coated.
5. Place the kale onto a baking tray in a single layer. You may need two baking trays to make sure the leaves don’t overlap. Bake for about 10 minutes then stir them to check for crispness. If they are still a little limp, bake for 2 more minutes and check again.
4 | Dessert
Upside Down Peach Cobbler
2 tablespoons butter
1/8 teaspoon salt
1/2 cup sugar
1/2 cup self-rise flour
1/2 cup buttermilk
2 fresh peaches (or 1 16 oz can of peaches)
1/2 teaspoon cinnamon
2 tablespoons sugar
Lemon Whipped Cream:
1 cup heavy whipping cream
1/2 teaspoon lemon extract
zest from 1/2 lemon
1 1/2 tablespoons powdered sugar
Want to make this dairy-free? For a great dairy-free cobbler, use vegetable or coconut oil instead of the butter and use coconut cream instead of the buttermilk. Instead of whipped cream, top the cobbler with your favorite non-dairy frozen dessert, like Almond Dream, SO DELICIOUS, or Coconut Bliss.
Make ahead option– This cobbler can easily be doubled and baked in a 9x13 baking dish. Once it's cooled, the cobbler can be kept in the refrigerator for up to 5 days. Simply reheat a portion when you are ready to enjoy some more.
The Simple Steps...
1. Preheat the oven to 400˚.
2. In 1.5 quart baking dish, melt the butter.
3. In a medium mixing bowl, stir together the flour, salt, sugar, and buttermilk until smooth. If you don’t have buttermilk or you’d just prefer a healthier version, use 1/4 cup plain low-fat greek yogurt and 1/4 cup milk instead.
4. Pour the batter into the baking dish.
5. Place freshly peeled and sliced peaches on top of the batter.
- My Method: In a large pot, bring 5 quarts of water to a boil.
- Cut a small “X” on the bottom of each peach. Cut the skin, but don’t cut into the flesh.
- Dip the peaches into the boiling water for 20-30 seconds each. The riper the peach the less time it needs in the water. Use a slotted spoon to remove the peach from the water.
- Continue this process until all the peaches have been dunked.
- Allow the peaches to cool a bit before you handle them. Then using a paring knife peel back the skins.
- Watch this video for more help.
6. Mix the 1/2 teaspoon cinnamon and 2 tablespoons sugar together. Sprinkle the mixture on top of the peaches.
7. Bake for 30 minutes until golden brown. Allow to cool before devouring it topped by lemon whipped cream.
Lemon Whipped Cream:
1. Pour the cream into a small mixing bowl. Whip for 2-3 minutes on high.
2. Watch this quick tip video for more help.
3. Stir the sugar, zest, and lemon extract into the cream.
QUICK TIP
Eat with our Eyes: We eat with our eyes. When something looks good, we enjoy it more and it tastes better. It sounds silly, but it also happens to be true. When there are fruits and vegetables of many different colors in one meal, that means there are different vitamins and minerals in it. For example, dark leafy greens are generally high in iron and some red vegetables contain lycopene or vitamin A. While it’s not an exact science, a colorful meal is usually a well balanced one. Be healthy. Make your food look vibrant and pretty.
WHAT DID YOU THINK?
What foods make you feel like you are at home again?
Remember, sharing is caring! Forward this email to your friends and family.